🌶️ Making Chili Crisp
🌶️ Homemade Chili Crisp
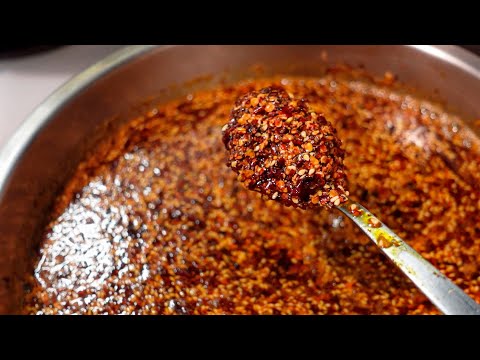
Homemade Chili Crisp, often referred to as chili oil, is described in the sources as an incredibly delicious, highly addictive condiment featuring lots of crispy bits, making it a powerful flavor enhancer that can be used on almost anything.
🔍 Defining Chili Crisp
The sources indicate that "chili crisp" and "chili oil" are closely related, with chili crisp being essentially chili oil that includes crispy bits.
- 🛢️ Chili oil is generally defined as oil infused with a combination of chilies, flakes, powders, and various aromatics.
- ✨ Chili crisp is recognized as having both the infused oil and the "sludge" or crispy bits (like fried garlic, shallots, or nuts).
- 🔄 The terms are sometimes used interchangeably, such as "crunchy chili garlic oil or chili crisp whatever you want to call it".
- 🏠 Homemade chili crisp allows for customization of flavor and heat, often being better than store-bought varieties.
🧄 Essential Ingredients and Customization
The two main parts of chili crisp are the chilies themselves and the crisp components. The sources provide extensive detail on oil choices, chilies, aromatics, and seasoning:
🛢️ Oil Selection
A neutral-flavored oil with a high smoke point is generally recommended for making chili crisp.
- ✅ Recommended oils include peanut oil, vegetable oil, canola oil, sunflower oil, grapeseed oil, corn oil, and teaseed oil.
- 🥑 Avocado oil is frequently mentioned due to its high smoke point, making it ideal.
- ⚠️ Some commercial brands use soybean oil or canola oil, which some people find undesirable as "highly processed" oils.
- ❌ Olive oil is generally not preferred because its strong flavor may interfere with the Asian condiments, or it may have a lower smoke point.
🔥 Chili and Heat Level
Homemade chili crisp can be tailored to any spice or heat level. Using vibrant red peppers helps achieve a bright red color in the final product.
- 🌶️ Common chilies include red chili flakes, Gochugaru (Korean chili powder, often milder but intensely fruity, and resistant to burning), and various Chinese or Asian dried chilies.
- 🔥 Specific pepper varieties mentioned for heat control include Thai chili, Chili Arbol (medium heat/aromatic), Kashmiri red chilies (fruity), serranos, and hotter options like habanero, ghost pepper, or Carolina reapers.
- ⚠️ Using pre-ground chili powder is discouraged as it tends to burn faster than flakes or manually crushed chilies.
- 💡 Removing the seeds from dried chilies reduces bitterness, not necessarily heat.
✨ Aromatics and Crispy Bits
Crispy bits are essential to chili crisp! 🥜
- 🧄 The main crispy components are usually thinly sliced shallots and garlic. A mandolin is often recommended for consistent, thin slices to ensure even frying.
- 🥜 Other crisp inclusions are toasted sesame seeds and crushed peanuts or soy nuts.
- 🫚 Some recipes include fresh ginger, scallions, or onions for flavoring the oil, which are often strained out and discarded.
🥢 Flavor Enhancers (Umami and Seasoning)
The goal is to create a flavor enhancer, not just a spicy condiment. 💥
- ✨ MSG is considered authentic and adds wonderful umami. If MSG is avoided, natural substitutes like mushroom powder (porcini), chicken stock cubes, or extra salt can be used.
- ⚡ Sichuan peppercorns are a non-negotiable ingredient for some, as they provide the characteristic numbing sensation (Mala). This sensation can give the perception of more heat.
- 🍯 Sweeteners like sugar, brown sugar, allulose, or honey are added for balance.
- ⭐ Other whole spices used for infusion include star anise, cinnamon sticks, bay leaf, cardamom, and cloves.
🎨 Flavor Profiles
Spicy 🔥 Garlicky 🧄 Crunchy 🥜 Umami Bomb 💥
The sources repeatedly describe Homemade Chili Crisp or Chili Oil as a potent flavor enhancer, often summarizing its flavor profile using these terms. These elements are the defining characteristics that make the condiment "seriously addictive" and suitable for use on "everything".
Here are discussions of these key components within the larger context of the chili crisp flavor profile:
🔥 Spicy (Heat)
The spicy element is fundamental, but the level of heat is highly customizable and can range from sweet mild to aggressively hot.
- The heat comes primarily from the types and amounts of chili peppers used
- Different varieties provide different heat profiles and flavors
- Sichuan peppercorns add a numbing sensation that enhances perceived heat
- Balance is key - too much heat can overpower other flavors
🧄 Garlicky
Garlic is one of the most important aromatics in chili crisp, providing a deep, savory foundation.
- Fresh garlic is sliced thin and fried until golden and crispy
- The frying process mellows the harsh raw garlic flavor
- Crispy garlic adds both flavor and texture
- Multiple forms of garlic (fresh, powder) can be layered for complexity
🥜 Crunchy
The textural contrast is what truly defines chili crisp versus simple chili oil.
- Crispy fried shallots and garlic provide satisfying crunch
- Toasted nuts (peanuts, soy nuts) add additional texture
- Sesame seeds contribute both crunch and nutty flavor
- The "sludge" at the bottom is treasure, not waste!
💥 Umami Bomb
Umami is the savory, deeply satisfying element that makes chili crisp so addictive.
- MSG provides pure umami flavor (authentic and safe)
- Fermented black beans (dou chi) add funky, salty depth
- Mushroom powder offers natural umami for MSG-free versions
- The combination creates a flavor that enhances almost any dish
👨🍳 Preparation Methods
There are two primary methods for making chili oil, often combined for chili crisp:
🐌 1. Low and Slow Simmer
This method is used when fresh, moisture-laden ingredients are present (like fresh chilies, garlic, or shallots). The oil is kept at a lower temperature (e.g., 250°F to 300°F or 100°C) and cooked slowly until the moisture is driven off and ingredients are crispy.
💧 2. Pour-Over and Shock Fry
This method is more suitable for dry ingredients. The oil is heated very hot (e.g., 375°F to 400°F or 140°C), allowed to cool slightly, and then poured over the chili mixture. This heat shocks the chilies, "blooming" the flavors and yielding a more colorful and fragrant oil. Pouring the oil in multiple stages (e.g., three pours) prevents the chilies from burning.
🍜 Texture
The texture of chili crisp is what sets it apart from regular chili oil!
🔧 For chili crisp, the cooking process usually involves:
- 🍳 Infusing the Oil: Frying the aromatics (ginger, garlic, shallots, whole spices) in the oil low and slow until they are golden brown and crispy, often removing them just before they look done because they continue cooking outside the oil.
- 🛢️ Infused oil: The oil itself carries flavor and heat, creating a complete condiment
- 🔄 Double Infusion (Advanced Method): Some recipes recommend straining the first batch of aromatics, then pouring the hot infused oil over a mild chili powder (like Gochugaru), straining that out, reheating the oil, and then pouring the oil over a second batch of chilies and texture builders.
- ✨ Adding Crispy Bits: Once the infused oil and chili base have completely cooled, the reserved crispy fried aromatics and other crunchy bits (like nuts) are stirred back in to maintain maximum crunch. Store-bought crispy shallots or garlic can be used for a quicker recipe.
- 🥜 Lots of crispy bits: chili flakes, shallots, garlic, and nuts provide satisfying crunch in every spoonful
- 🌊 Sludge (flavor builders at bottom): The concentrated mixture at the bottom of the jar contains all the flavor-packed solids - this is the most valuable part!
- ⚖️ Balance: The ratio of oil to crispy bits can be adjusted to personal preference.
☕ Coffee Analogy: Making simple chili oil (Method 2: Pour-Over) is like making a quick, strong pour-over that extracts the color and aroma immediately; while making chili crisp involves an extra step (Method 1: Low and Slow) of carefully frying the aromatics first, which is like slow-roasting the beans to maximize their savory, complex flavor before the final infusion.
✨ChiliCrisp🌶️Recipe👨🍳
Makes: 32 fl oz (8 four-ounce Mason jars)
Prep Time: 60 minutes | Cook Time: 40-50 minutes | Total Time: 1 hour 45 minutes
The spiciest, most flavorful, aromatic, and chunky chili crisp you'll ever taste!
📋 Gather your Ingredients:
Base Oil
(The Foundation)
| Ingredient |
Quantity |
Uses & Ideas |
| Avocado Oil |
24 fl oz (3 cups) |
High smoke point (500°F), neutral flavor, heart-healthy monounsaturated fats. Perfect base for high-temperature cooking without burning. |
Aromatics
(For Infusing the Oil)
| Ingredient |
Quantity |
Uses & Ideas |
| Shallots |
4 large (thinly sliced) |
Creates crispy texture and sweet, complex flavor. Essential for that addictive crunch. Use on noodles, rice bowls, eggs, pizza, sandwiches. |
| Garlic |
24 cloves (6 heads, thinly sliced) |
Provides pungent, savory base notes. Becomes sweet and nutty when fried. Perfect for pasta, stir-fries, roasted vegetables, grilled meats. |
| Fresh Ginger |
2 oz (peeled, julienned) |
Adds bright, warming spice and floral notes. Excellent for Asian-inspired dishes, soups, dumplings, stir-fries. |
| Green Onions/Scallions |
1 bunch (white and light green parts, chopped) |
Contributes mild onion flavor with herbaceous notes. Great for topping rice, noodles, eggs, tofu dishes. |
| Star Anise Pods |
3 whole pods |
Adds sweet, licorice-like aroma and depth. Enhances braised meats, noodle soups, marinades. |
| Cinnamon Sticks |
2 sticks (3-inch pieces) |
Provides warm, sweet-spicy undertones. Excellent for balancing heat, works with both savory and sweet applications. |
Chili Components
(The Heat & Color)
| Ingredient |
Quantity |
Uses & Ideas |
| Sichuan Chili Flakes |
3 cups |
Primary heat source with fruity, slightly smoky flavor. For maximum heat and authentic flavor. Use liberally on everything from eggs to ice cream! |
| Korean Gochugaru |
1 cup |
Adds vibrant red color and moderate, fruity heat. Creates visual appeal and sweet-spicy balance. Perfect for Korean dishes, rice bowls, and Bibimbap (비빔밥). |
| Dried Arbol Chilies |
½ cup (stemmed, crushed) |
Provides sharp, searing heat. For those who want extreme spice levels. Use in salsas, hot sauces, spicy marinades. |
| Chipotle Chili Powder |
¼ cup |
Adds smoky depth and complexity. Enhances grilled meats, BBQ dishes, Mexican cuisine, chili, tacos. |
| Smoked Paprika |
4 Tablespoons |
Contributes deep red color and smoky-sweet notes. Essential for Spanish-inspired dishes, deviled eggs, roasted potatoes. |
| Regular Paprika |
2 Tablespoons |
Adds mild sweetness and rich color without additional heat. Balances the intense spice blend. |
Spices & Seasonings
(The Complexity)
| Ingredient |
Quantity |
Uses & Ideas |
| Sichuan Peppercorns |
3 Tablespoons (toasted & ground) |
Creates unique numbing sensation (málà). Essential for authentic Sichuan flavor. Use in mapo tofu, dan dan noodles, hot pot. |
| Black Peppercorns |
2 Tablespoons (toasted & ground) |
Adds sharp, pungent heat and aromatic depth. Complements the Sichuan peppercorns beautifully. |
| Coriander Seeds |
1½ tablespoons (toasted & ground) |
Provides citrusy, slightly sweet notes. Balances heat with brightness. Great for curries, pickles, roasted vegetables. |
| Cumin Seeds |
1½ tablespoons (toasted & ground) |
Adds earthy, warm complexity. Essential for depth. Perfect for Middle Eastern and Mexican dishes. |
| Cardamom Pods |
2¼ teaspoons (seeds only, ground) |
Contributes floral, citrus-mint notes. Adds sophistication and aromatic complexity. |
| Five-Spice Powder |
2¼ Teaspoons |
Brings sweet-savory-bitter balance. Enhances Chinese dishes, roasted meats, glazes. |
Umami Boosters
(The Savory Depth)
| Ingredient |
Quantity |
Uses & Ideas |
| MSG (Monosodium Glutamate) |
1½ tablespoons |
Amplifies umami and makes flavors pop. Creates addictive savory quality. Essential for maximum deliciousness! |
| Mushroom Powder |
2 Tablespoons |
Adds natural umami and earthy depth. Perfect for vegetarian applications, broths, gravies, risotto. |
| Light Soy Sauce |
6 Tablespoonss |
Provides salty-savory backbone and liquid for blending. Use for marinades, dipping sauces, fried rice. |
| Dark Soy Sauce |
2 Tablespoons |
Adds deep color, subtle sweetness, and molasses notes. Essential for authentic Chinese color and flavor. |
Texture & Crunch
(The "Crisp" in Chili Crisp)
| Ingredient |
Quantity |
Uses & Ideas |
| Roasted Peanuts |
1 cup (roughly chopped, dust removed) |
Creates substantial crunch and nutty richness. Use as topping for pad thai, salads, noodle bowls, ice cream! |
| Toasted Sesame Seeds |
½ cup (white & black mixed) |
Adds nutty flavor and visual appeal. Essential textural component. Perfect for garnishing everything! |
| Roasted Soybeans |
½ cup |
Provides hearty crunch and protein. Adds authentic texture. Great for adding substance to the crisp. |
| Fried Shallots |
½ cup (store-bought or homemade) |
Extra crispy texture and sweet-savory notes. Use as finishing touch on salads, rice dishes, soups. |
Finishing Touches
(The Balance)
| Ingredient |
Quantity |
Uses & Ideas |
| Granulated Sugar |
¼ cup |
Balances heat and enhances other flavors. Creates complex sweet-spicy-savory profile. |
| Sea Salt |
3 Tablespoons (plus more to taste) |
Essential for bringing out all flavors. Adjust to personal preference. |
| Toasted Sesame Oil |
3 Tablespoons |
Adds final layer of nutty aroma. Stir in at the end to preserve delicate flavor. |
Temperature control is EVERYTHING!
Use a thermometer to ensure perfect results without burning.
👨🍳 Chef's Secrets for Success
Temperature Mastery
The #1 Rule: Invest in a good instant-read thermometer. It's the difference between sublime and ruined.
- 225-250°F: Perfect for frying aromatics to golden perfection
- 350-375°F: First oil pour for maximum aroma extraction
- 275-300°F: Second pour for vibrant color
- 200-225°F: Third pour for pure heat without bitterness
- Above 400°F: DANGER ZONE - Everything burns and tastes bitter
The Crispy Bits Technique
Secret to Maximum Crunch: The aromatics must be bone-dry before frying, fried low and slow until pale gold, then cooled in a single layer. They crisp up as they cool, just like bacon!
Avoiding Common Mistakes
- Dark brown aromatics: You cooked too hot or too long. They'll taste bitter.
- Soggy texture: Oil wasn't hot enough, or you didn't dry the ingredients first.
- Burnt chili taste: First oil pour was too hot (over 380°F). No recovery from this - start over.
- Weak flavor: Oil pours were too cool (under 200°F), or you didn't rest it long enough.
- Uneven cooking: Poured oil too fast, or didn't stir constantly during the pour.
Scaling & Customization
Heat Level Adjustments:
- Milder version: Reduce Sichuan flakes to 2 cups, omit arbol chilies, increase gochugaru
- EXTREME heat: Add ½ cup crushed ghost pepper or Carolina reaper flakes
- Less numbing: Reduce Sichuan peppercorns to 1 Tablespoon
- More numbing: Increase to ¼ cup for intense málà sensation
The Umami Bomb
Don't skip the MSG! It's not harmful (that's a myth), and it makes every other flavor shine. If you're still concerned, substitute with an equal amount of mushroom powder or nutritional yeast, but it won't be quite the same.
Make It Your Own
Optional add-ins for customization:
- Anchovy paste: 2 teaspoons for funky umami depth
- Fried garlic chips: ½ cup for extra garlic punch
- Dried shrimp: 4 tablespoons crushed for seafood umami
- Crispy fried onions: ½ cup for additional texture
- Szechuan preserved vegetables: 2 tablespoons minced for complexity
- Black bean paste: 1 tablespoon for fermented depth
👨🍳 Instructions
(8 Steps)
Step 1: Prepare Your Aromatics
(15 minutes)
Begin by preparing all your aromatics. This is crucial for success, as everything moves quickly once you start cooking.
- Peel and thinly slice 4 large shallots into ⅛-inch rings. Keep them as uniform as possible for even cooking.
- Peel and thinly slice 24 garlic cloves (about 6 heads). Try to maintain consistent ⅛-inch thickness.
- Peel fresh ginger (2 oz) and cut into thin julienne strips.
- Chop 1 bunch of scallions, using only the white and light green parts.
- Separate your star anise pods (3 whole) and cinnamon sticks (2 pieces) - you'll add these to the oil.
Pat all your sliced aromatics completely dry with paper towels. Any moisture will cause dangerous spattering when they hit the hot oil!
Step 2: Toast and Grind Your Spices
(10 minutes)
Toasting awakens the essential oils in your spices and creates depth that can't be achieved any other way.
- Heat a large, dry skillet over medium heat.
- Add Sichuan peppercorns (3 tablespoons), black peppercorns (2 tablespoons), coriander seeds (1½ tablespoons), and cumin seeds (1½ tablespoons).
- Toast for 2-3 minutes, stirring constantly, until fragrant and slightly darkened. You'll know they're ready when you can smell them across the room!
- Remove immediately to a cool plate to stop the cooking.
- Once cooled, grind in a spice grinder or mortar and pestle until coarsely ground (not powder).
- Toast sesame seeds (½ cup) separately in the same pan for 3-4 minutes until golden. Set aside.
The Three-Part Toast: The slight bitterness from perfectly toasted spices creates complexity that distinguishes restaurant-quality chili crisp from amateur versions.
Step 3: Fry the Aromatics
(30-40 minutes)
This is where the magic happens! Low and slow is the secret to achieving golden, crispy aromatics without burning.
- Add 24 fl oz (3 cups) of avocado oil to your largest, heaviest pot or Dutch oven.
- Heat oil over medium heat to exactly 225°F (use a thermometer!).
- Add star anise pods (3) and cinnamon sticks (2) first. Let them infuse for 5 minutes.
- Add all sliced shallots, garlic, ginger, and scallions to the oil.
- Maintain temperature between 225-250°F. This is critical! Too hot and everything burns; too cool and it stays soggy.
- Fry for 25-35 minutes, stirring gently every 3-4 minutes, until aromatics turn pale golden brown and smell incredibly fragrant.
- Using a fine-mesh strainer or spider, carefully remove all aromatics and spread on paper towels. Save that precious oil!
- Let the aromatics cool completely - they'll crisp up as they cool. Remove and discard the star anise and cinnamon sticks.
The aromatics should be pale gold, not dark brown! They'll continue cooking from residual heat. When in doubt, remove them early - you can always cook them longer, but you can't un-burn them.
Step 4: Prepare the Spice Bowl
(5 minutes)
While aromatics cool, prepare your spice mixture. This must be done in advance so everything's ready for the crucial oil pour.
- In your largest heatproof bowl (ceramic, stainless steel, or oven-safe - NEVER GLASS!), combine:
- All your chili flakes: Sichuan (3 cups), gochugaru (1 cup), crushed arbol chilies (½ cup)
- All ground spices: toasted Sichuan peppercorn, black pepper, coriander, cumin
- Chipotle powder (¼ cup), smoked paprika (3 tablespoons), regular paprika (2 tablespoons)
- Five-spice powder (2¼ teaspoons), ground cardamom (2¼ teaspoons)
- MSG (1½ tablespoons), mushroom powder (2 tablespoons)
- Sugar (¼ cup), salt (3 tablespoons)
- Already-toasted sesame seeds (½ cup)
- Mix everything thoroughly with a large spoon.
- Make sure the bowl has at least 4 inches of clearance from the rim - the oil will bubble dramatically!
Step 5: The Critical Oil Pour
(5 minutes)
This is the moment of truth! The temperature and technique here determine the final flavor.
THE THREE-TEMPERATURE POUR METHOD: This professional technique extracts maximum aroma, color, and spice in stages. It's what separates good from extraordinary!
- First Pour (350-375°F - AROMA): Heat your infused oil to 350-375°F. Pour ⅓ of the hot oil slowly over the spice mixture while stirring constantly. It should sizzle and bubble vigorously. This extracts the aromatic compounds.
- Second Pour (275-300°F - COLOR): Wait 3-4 minutes for oil to cool to 275-300°F. Pour another ⅓ of the oil slowly while stirring. This extracts the vibrant red color from the chilies.
- Third Pour (200-225°F - SPICE): Wait another 3-4 minutes for oil to cool to 200-225°F. Pour the final ⅓ slowly while stirring. This extracts the pure capsaicin heat without burning.
Pour VERY slowly and keep stirring! If you dump it all at once, you'll get uneven cooking - some parts burnt, others raw-tasting. Take your time here, and be careful with the hot oil!
Step 6: Add the Crunch Components
(3 minutes)
Now we add texture and the final flavor layers!
- Immediately stir in the chopped peanuts (1 cup) and roasted soybeans (½ cup) while the mixture is still very hot. They'll absorb oil and get even crunchier.
- Add the soy sauces: light soy sauce (6 tablespoons) and dark soy sauce (2 tablespoons). Stir thoroughly.
- Mix in the fried shallots (½ cup) for extra crunch.
- Finally, drizzle in the toasted sesame oil (3 tablespoons) - this goes in last to preserve its delicate aroma.
- Return all your cooled, crispy aromatics (the fried shallots, garlic, ginger, and scallions) to the bowl.
- Stir everything together thoroughly, making sure all ingredients are evenly distributed.
Step 7: Cool and Rest
(2-24 hours)
Patience is a virtue! The flavors need time to marry and develop.
- Let the chili crisp cool completely to room temperature, stirring occasionally. This takes about 1-2 hours.
- Once cool, taste and adjust seasoning. Add more salt if needed, or a bit more sugar to balance heat.
- Cover and let rest at room temperature for at least 2 hours, or ideally overnight in the refrigerator.
- The flavors will deepen significantly over the first 24-48 hours. It gets better with age!
Why Resting Matters: The oil continues to extract flavors from the aromatics, the spices fully hydrate and bloom, and all the components meld into a harmonious whole. The chili crisp you taste immediately will be good, but the one you taste tomorrow will be phenomenal!
Step 8: Store and Enjoy
(Up to 3 months)
Proper storage ensures maximum shelf life and food safety.
- Transfer to sterilized Mason jars (8x 4oz Mason jars or 4x 8oz jars).
- Make sure oil covers all the solids - this prevents oxidation and spoilage.
- Seal tightly and refrigerate. The oil may solidify slightly when cold but will quickly liquify at room temperature.
- Always use a clean, dry spoon when serving to prevent contamination.
- Stir before each use to redistribute the crispy bits.
🍜 Serving Suggestions
Pro Tip: Start with a small amount (1-2 teaspoons) and add more to taste. This stuff is concentrated flavor!
🍳 Breakfast & Brunch
- 🍳 Eggs (fried, scrambled, poached)
- 🥑 Avocado Toast
- 🥯 Bagels with cream cheese
- 🥣 Oatmeal (savory preparation)
🍜 Asian Dishes
- 🍜 Noodles (ramen, cold noodles, stir fry)
- 🥟 Dumplings
- 🍚 Rice and Risotto
- 🥘 Stir-fries
🌮 International Favorites
- 🍕 Pizza
- 🌮 Tacos and Quesadillas
- 🥟 Ravioli and Pierogies
- 🥪 Sandwiches
🥗 Soups & Salads
- 🍲 Soups and Stews
- 🥗 Salad Dressings (vinaigrette base)
🍦 Experimental
- 🍦 Ice Cream (yes, really! Sweet and spicy contrast)
🎯 Why This Recipe Works
This recipe combines traditional Sichuan techniques with modern food science to create the perfect balance of heat, numbing spice, crunch, umami, and aroma.
The Science Behind the Success:
- Three-temperature oil pour: Extracts different compounds at different temperatures - aromatics at high heat, color at medium, capsaicin at low
- Low-temperature frying: Prevents acrylamide formation (bitter compounds) while achieving crispness
- Toasted spices: Heat volatilizes essential oils, making them more bioavailable and fragrant
- Resting period: Allows flavors to meld and oil to fully extract compounds from solids
- MSG + mushroom powder: Creates umami synergy that's greater than the sum of parts
- Sugar balance: Reduces perceived heat while enhancing other flavors (sweet-heat balance)
- Multiple chili types: Different capsaicinoids create complex, layered heat rather than one-dimensional burn
🏺 Usage and Storage
Chili crisp is a highly versatile condiment that can be used to enhance virtually any food.
- 🍳 Common applications mentioned include drizzling it over eggs, avocado toast, pizza, tacos, dumplings, noodles, ramen, stir fry, rice, and even ice cream.
- ⏰ It is advised that the chili crisp is often better after sitting for a couple of days to allow the flavors to infuse into the oil.
- 🏺 For storage, it should be kept in a jar. It can last for several months in the refrigerator, or 6 to 10 months at room temperature if sealed.
- ⚠️ It is important to only use a clean, dry spoon when scooping it out to prevent molding.
📦 Storage & Food Safety
Critical Safety Information
Because this contains fresh garlic and aromatics infused in oil, there is a risk of botulism if stored improperly. Follow these rules religiously:
- Always refrigerate after the initial cooling period
- Never store at room temperature for more than 2 hours after making
- Use clean utensils only - no double-dipping or licking spoons
- Check for spoilage before each use: off smells, mold, or color changes
- Discard if in doubt - it's not worth the risk
- Maximum shelf life: 3 months refrigerated
Optimal Storage
- Use glass mason jars with tight-fitting lids
- Leave ½ inch headspace at the top
- Label with date made
- Store in the main body of the refrigerator, not the door
- Keep away from strong-smelling foods (it can absorb odors)
📦 Storage & Longevity
❄️ Freezing
The sources provide clear information regarding the possibility of freezing homemade chili crisp, positioning it as a valid option for long-term storage, though specific details are limited primarily to preparation for the freezing process.
🧊 Freezing as a Storage Option
The sources confirm that chili crisp is suitable for freezing:
- Homemade chili crisp can be frozen.
📦 Preparation for Freezing
A specific safety precaution is given concerning the container used for freezing, relating to the expansion of liquids upon solidification:
- When freezing, ensure you are "throwing into a vessel that allows a little bit of room for expansion". This ensures the container does not break when the oil mixture freezes and expands.
⏰ Context within Overall Shelf Life
While freezing offers the maximum potential longevity, the sources indicate that standard refrigeration and room temperature storage also yield long shelf lives:
- 🧊 Refrigeration: Chili crisp generally will keep for several months in the refrigerator. Some estimates suggest it will stay good for about four to 5 weeks or up to a few months.
- 🏠 Room Temperature: If properly sealed up, it can last 6 to 10 months at room temperature.
🖼️ Analogy: Think of freezing chili crisp like storing an oil painting. You can keep the painting safely preserved for a very long time by controlling its environment (the freezer), but you must ensure it's framed in a container (the vessel) that has enough space to handle any movement or expansion (like the oil expanding when it solidifies) so that the masterpiece remains intact and uncracked.
🛡️ Preservation Aids
Ensuring all fresh ingredients are cooked through
The sources strongly emphasize that ensuring all fresh ingredients are cooked through is the fundamental and critical component of proper preservation when making homemade chili crisp or chili oil, making it the most important of the practical Preservation Aids mentioned.
⚠️ The Necessity of Thorough Cooking for Spoilage Prevention
When fresh aromatics such as ginger, garlic, shallots, and onions are used, they contain moisture that can lead to rapid spoilage if not completely removed. The sources make this requirement explicit:
- 💧 Direct Answer to Spoilage Concern: In response to the query, "Can you add fresh ingredients like ginger, garlic, onion, and if you do, would that make the oil spoil faster?" the sources confirm that if you use fresh ingredients, you "must cook them through". By doing so, "you don't have to worry about spoilage".
- 🔥 The Goal is Dehydration: The low-and-slow frying process (often around 300°F or 149°C) is specifically aimed at achieving this goal. This process is necessary to "cook out all the moisture" from ingredients like ginger, which in turn makes them "nice and crispy".
- ⚠️ Preventing Bitterness/Burning: The process of frying these ingredients is delicate; the cook must "take our time to let the moisture cook out". If the oil gets too hot, the ingredients will burn instead of achieving the desired aromatic, dehydrated state.
🕐 Cooking as the Primary Preservation Aid
Unlike other ingredients added for preservation, the act of cooking out moisture is the core technique that enables the chili crisp to achieve its remarkably long shelf life:
- ⏰ Extended Longevity: Because the fresh ingredients are fully dehydrated during cooking, the finished product can last for "several months in the refrigerator" or even "6 to 10 months in room temperature" if sealed well.
- 🍶 Contrast with Other Aids: While other minor aids are mentioned (such as a splash of Chinese black vinegar to "help preserve it a little bit so it lasts longer"), the complete dehydration of fresh aromatics is the most effective safeguard against mold and spoilage.
🧼 Reinforcement through Handling Safety
The necessity of ensuring all fresh ingredients are cooked through is reinforced by the strict safety rules regarding storage and serving:
- If the internal moisture is successfully eliminated during cooking, the only remaining risk of mold comes from external cross-contamination, such as dipping a "wet spoon" into the jar, which will cause the oil to "go moldy". This highlights that the complete absence of water is the defining characteristic of a properly preserved chili crisp.
In essence, ensuring all fresh ingredients are cooked until they are completely crisp and dehydrated is the foundational Preservation Aid that transforms perishable raw aromatics into stable, long-lasting components of the chili oil. 🛡️
💭 Final Thoughts
Congratulations! You've just created 32 ounces of the most spectacular chili crisp possible. This recipe represents thousands of years of Sichuan culinary tradition combined with modern technique.
Now go forth and put this chili crisp on EVERYTHING! 🌶️✨
 Comprehensive guide on making chili crisp with detailed techniques and tips.